Congrats – you’ve purchased a domain! But now you’re thinking, “ok, I have a domain name, now what?” Indeed, owning a domain is a great first step in establishing an online presence for your business, project, or personal brand. But now that you have one, the question is how to use a domain name? What comes next? This guide will walk you through eight essential steps to help you get your domain up and running, ensuring that you’re set up for success online.
What to Do With Your Purchased Domain
Choosing a domain name is exciting, but turning that purchased domain into a fully functional and professional online presence requires several key steps. Below, we’ll explore what you need to do after purchasing a domain, starting with simple-but-essential steps – like securing social media handles – and then getting into the nitty gritty of creating a website, and more. Let’s get started!
1. Secure Social Media Handles
You’ve got a domain, and social media may not be on your radar just yet – but it should be. Even if you don’t plan on actively using social media right away, securing social media handles that match your domain name is a smart move. Consistent branding across platforms helps maintain a cohesive identity, making it easier for customers to find, recognise, and remember you.
Check availability for your domain name on popular social media sites like Facebook, Instagram, Twitter, and LinkedIn. You can use tools to quickly see which handles are available across multiple platforms. Once reserved, these social media accounts will be ready for use whenever you decide to start promoting your brand.
If, however, you find that your name isn’t available, consider getting creative by adding an extra word to the handle name. For example, you could add words like “hello,” “get” or “shop” to the beginning of your brand name. Or, if your business is regionally based, you might consider adding your city or region to the social media handle. By adding an extra word, you’ll have more name options at your disposal. This, by the way, is also a great strategy for choosing a domain name if you find that your first choices aren’t available.

2. Register and Trademark Your Business
If you haven’t already, registering and/or trademarking your business name is a good step to protect your brand legally and reduce the risk of litigation. This process helps prevent others from using your name in ways that could create confusion or harm your reputation, and it also safeguards you from potential legal issues with other businesses that might later claim rights to your brand name. Trademarking and registration requirements vary by country, so it’s best to consult local government resources or legal guidance for accurate information.
3. Plan Your Website
Now it’s time to start thinking about how exactly you want to build your site. You can choose various methods, ranging from website builders to content management systems (like WordPress), and custom coding. Which route you go with will depend on various factors, including your budget, customisation needs, and level of tech savviness.
Website builders, for example, typically offer a user-friendly, drag-and-drop approach that simplifies website creation without needing much technical knowledge. Also, many site builders often host your site for you, which means you don’t have to think about web hosting (which we’ll get to in a moment).
All this said, you typically have to pay a monthly fee to publish and use your site, and there are often ongoing costs for extra features. Plus, they typically don’t offer extensive customisation unless you pay for added plugins or custom coding.
Alternatively, a content management system (CMS) like WordPress enables users to easily create and customise sites of all kinds – from blogs to online stores – given its vast array of themes, plugins, and tools. While it may require a bit more technical skill, WordPress offers flexibility and scalability, making it a cost-effective choice for a customisable website.
Meanwhile, a custom-built site offers the most unique functionality and design options but comes with higher upfront and ongoing costs, especially if external developers are involved. In both these latter two cases – a CMS and a custom-built site – you would likely need to make a decision around web hosting, which brings us to step 4!
4. Get a Web Hosting Plan
If you don’t use a web-hosted sitebuilder, then you’ll need a web hosting plan in order to bring your website and domain name to life. Hosting provides the servers, storage, and infrastructure required to keep your website files online and accessible to users. Essentially, hosting acts as the foundation for your website, allowing your domain to connect with the servers where your site data is stored so that visitors can view it on the web.
There are several types and combinations of hosting available, including shared hosting, cloud hosting, managed WordPress hosting, and more – each suited to different levels of website traffic, control, and technical needs.
For example, Nu-Teq offers managed WordPress hosting, which is particularly beneficial for WordPress users seeking ease of use with optimised security, performance, and automatic updates.
5. Ensure Your Purchased Domain Points to the Right Hosting Servers
Whether you’ve chosen to use a web-hosted sitebuilder, or to buy your own hosting and create a site with a CMS, you’ll need to make sure that your domain directs to your actual site. If you’ve purchased your domain and hosting from the same provider, the setup may already be done for you.
However, if you’ve bought your domain from one provider and your hosting from another, you’ll need to point your domain to your hosting provider. This process, known as “domain pointing,” involves updating your domain’s DNS (Domain Name System) settings to connect it to your website’s files on your hosting server.
To do this, you will need to consult your domain and hosting providers for exact instructions, but the process is generally pretty simple.
Moving a domain is really quite easy – never mind that the benefits of having a truly top-notch hosting provider make the few minutes it takes to correctly point your domain absolutely worth it.
6. Build a Website
Now to finally put that domain name to work: by building your website! Start by defining your goals – both short-term (like lead generation) and long-term (like brand awareness) – and determine the actions you want visitors to take, as well as how you’ll measure success.
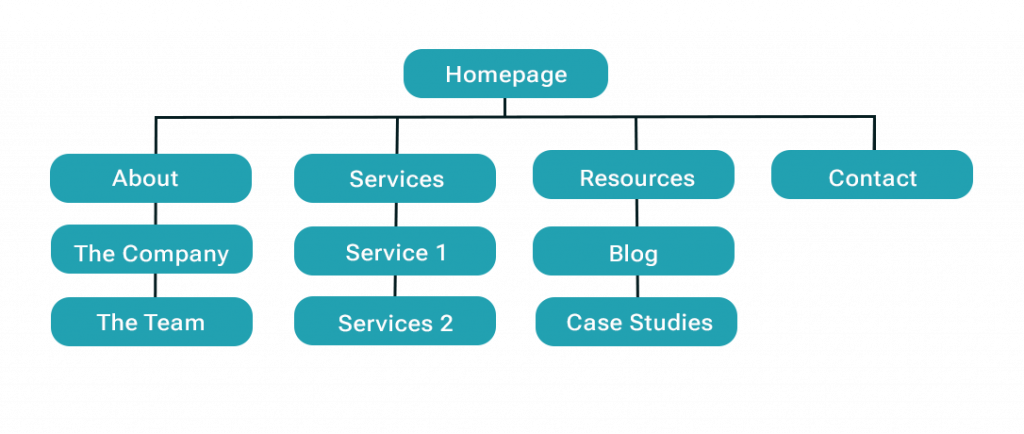
Another important step to take during this process is to spend time identifying your target audience so that you can build your website content to speak directly to them. You’ll also want to establish and round up branding elements, such as your logo, color scheme, typography, etc.
It will also be helpful to map out your website architecture so that you know exactly what content you need to round up – from copy to imagery and other design elements. From there, you can start putting everything together and bringing your website to life!
The process is of course a bit more elaborate than what we can cover here.
7. Submit Your New Website to Search Engines
Once your website is live, you’ll want search engines to start indexing it so that people can find it. Google Search Console, for example, allows you to submit your website and sitemap, which helps search engines crawl your site more efficiently.
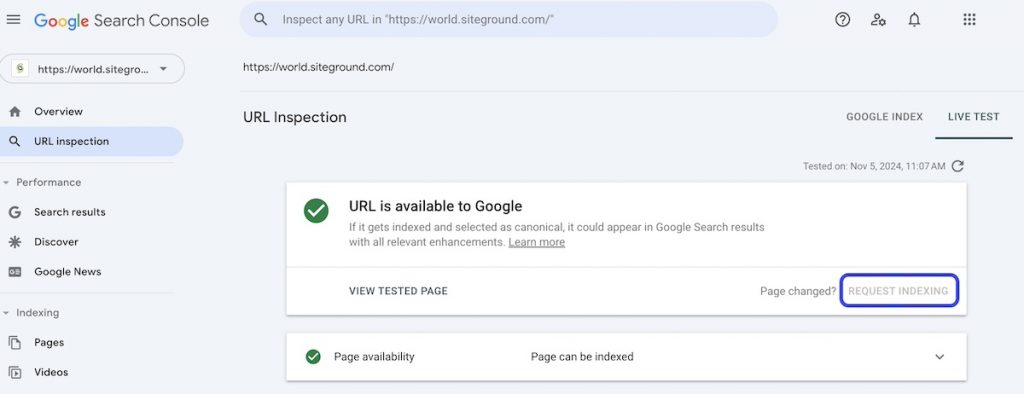
Submitting your site to search engines gives it the best chance to appear in search results and drive organic traffic. While search engines may eventually find your site on their own, submitting it directly can speed up the process so that people can start seeing the fruits of your labour sooner rather than later.
8. Create a Personalised Email Address Using Your Domain Name
A professional email address using your domain (such as yourname@yourdomain.com) adds credibility and strengthens your brand’s identity – and it’s also more memorable. Most hosting providers include email services, allowing you to create domain-based email addresses directly from their control panel.
After this step, you can set up your email on a computer by configuring it to work with popular email clients like Outlook, Gmail, or Apple Mail. A personalised email address is a small but impactful way to present a professional image to your audience and potential customers.
Takeaways on What to Do After Buying a Domain Name
Purchasing a domain name is just the first step in building a strong online presence. Following these eight steps will help you transform your domain into a fully functioning, professional website (and email!) that’s ready to serve your audience and grow your brand. From securing social media handles, to selecting hosting, and building a website, each step ensures your online setup is optimised for success.
FAQ
I Purchased a Domain, Do I Own It?
When you buy a domain, you don’t technically “own” it outright. Instead, you’re registering the rights to use it for a specific period (typically one year, which is renewable). As long as you continue renewing it, you retain control of the domain and can use it as your online address. If you haven’t yet registered a domain name, note that usually there is an annual cost – that said, when you purchase one of our web packages, Nu-Teq offer the domain for free for the first year!
Can I Move My Domain to a Different Hosting Provider?
Yes, you can transfer your domain from one hosting provider to another if you choose. The basic steps for this process include unlocking the domain and requesting an authorisation (EPP) code from your current registrar (likely a current or previous hosting provider). Then, initiate the transfer with your new provider by entering the domain name and EPP code. Note that you may need to update your DNS settings as well.
What is Domain Privacy Protection and Do I Need It?
Domain privacy protection, also known as WHOIS privacy, is a service that keeps your personal information – such as your name, address, phone number, and email – confidential when you register a domain name. Without this protection, your details become publicly accessible through the WHOIS database, which can lead to unwanted solicitations, spam, and even identity theft.
How do you hide your personal information in the domain name WHOIS details? You can usually select domain privacy protection during the registration process with your hosting provider or domain registrar. Many web hosts and registrars offer this service, ensuring your personal information is replaced with their contact details in the WHOIS database.